In a nutshell
- 🧪 The science: copper on a penny, plus mild acid and a pinch of salt, disrupts metal oxides while the coin’s rim provides gentle micro-abrasion—lifting grime in seconds.
- 🧼 Best targets: erases metal scuffs on porcelain sinks, enamel cookware, glazed tiles; brightens brass. Use a feather touch on stainless steel; avoid non-stick coatings, lacquered metals, marble/limestone.
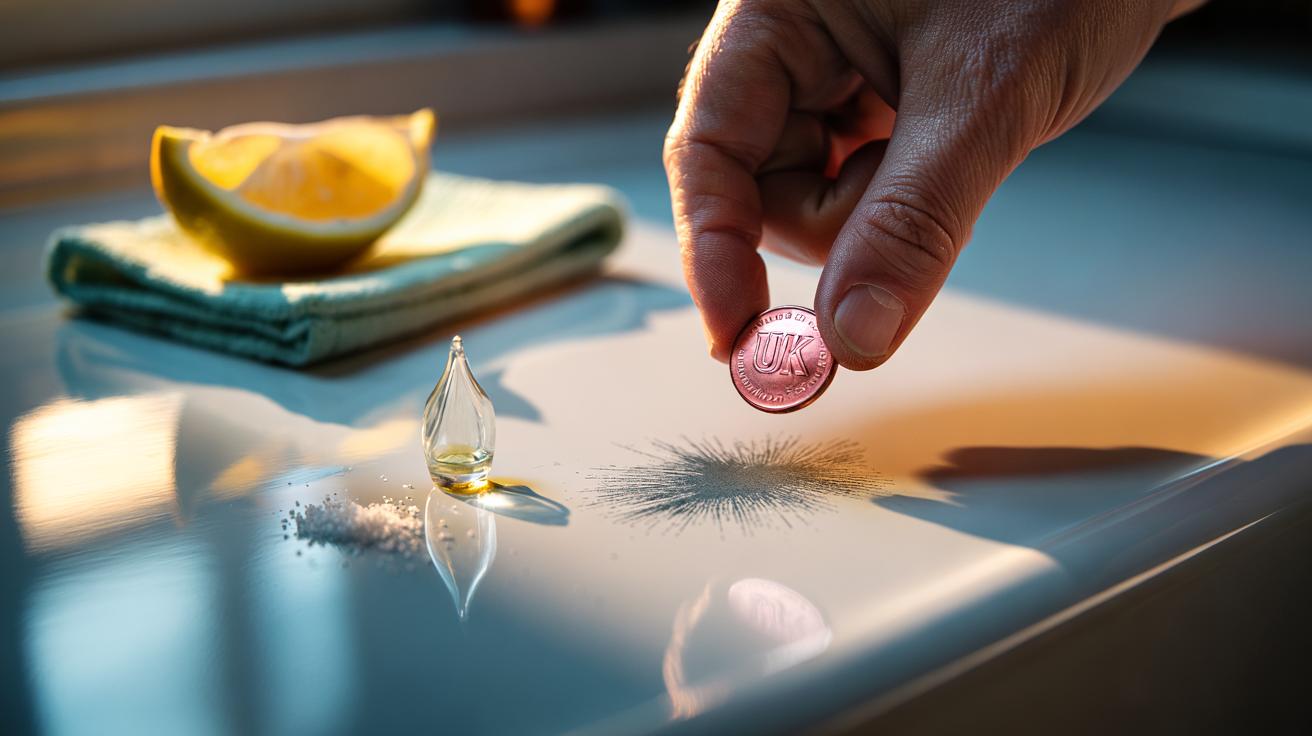
- 🛠️ Safe method: clean the coin, wet the mark with vinegar or lemon, add a tiny pinch of salt, use the rim with light strokes, then rinse and neutralise with diluted bicarbonate; dry thoroughly.
- 🪙 Coin facts & hygiene: pre‑1992 1p/2p are softer bronze; post‑1992 are copper‑plated steel—test first on delicate glazes. Sanitise coins and wash food-contact surfaces after use; consider a copper scourer for larger areas.
- ⚖️ Limits & legality: won’t fix dyes, inks, mould, or heavy limescale—use targeted cleaners (e.g., chelating descaler, oxygen bleach). Using a coin as a tool is fine; defacing/melting for fraud is not.
Britons have always loved a thrifty fix, and few hacks are thriftier than reaching into your pocket for a penny to wipe away stubborn marks. The trick sounds like folklore, yet there’s real chemistry behind it: copper on the coin’s surface can disrupt oxides, lift metal scuffs, and polish away film in moments. UK 1p and 2p coins are bronze pre-1992 and copper‑plated steel afterwards, so the working face is still copper. Used carefully, it’s swift, cheap, and oddly satisfying. Speed comes from the blend of copper’s surface activity and a light touch, not brute force. Here’s what’s really happening, where it works, and when you should think twice.
The Chemistry Behind the Shine
A penny’s cleaning power isn’t magic; it’s materials science. The thin layer of copper can loosen and recondition surface films, especially when paired with a mild acid such as vinegar or lemon juice. Copper’s surface oxidises readily, and those fresh sites interact with grime and metal oxides on sinks, pans, and tiles. Add a pinch of salt and the mix becomes more conductive. The combination helps dissolve iron oxides and destabilise dark scuffs left by ferrous metals, while the coin’s edge provides micro-abrasion without the deep gouges a steel tool might inflict.
Think of it as a three-part mechanism. First, mild acidity softens the stain or oxide layer. Second, chloride ions from table salt accelerate the loosening of rust-like films and prevent re-deposition. Third, the coin acts as a gentle abrasive, pushing the loosened layer aside and burnishing the surface underneath. Done correctly, the reaction happens fast—often within seconds—and the shine is mechanical as much as chemical.
There is a boundary. Copper won’t neutralise dyes or tannins; it’s not a miracle for tea stains or felt-tip ink. And prolonged contact with acidic solutions can encourage patina (blue-green copper salts) that you do not want on ceramics or grout. Use the chemistry momentarily, then rinse.
Where a Penny Works Wonders
Household stains vary, so match the tool to the task. Pennies excel at removing metal scuffs—those grey streaks on porcelain sinks, enamelled cookware, and glazed tiles—from dropped pans, cutlery, or appliance feet. They can also re-brighten brass and copper fixtures, especially if you dab the coin in lemon juice and salt for a quick lift. On stainless steel, the coin can lift oxidation blooms or transfer marks, but use an ultra-light touch and follow the grain. If a surface is lacquered, non-stick, or labelled “no abrasives,” a penny is the wrong tool.
Time matters. If you need to shift a speck fast, the coin’s narrow edge concentrates pressure and energy. For larger areas, a purpose-made copper scourer is safer and more uniform. And remember the UK coin quirk: pre-1992 1p/2p coins are bronze (softer, all-copper alloy), while post-1992 are copper-plated steel (harder edge, still copper-faced). For delicate glazes, the older bronze coin is typically kinder.
| Surface | Stain Type | Method | Typical Time | Caution |
|---|---|---|---|---|
| Porcelain sink | Metal scuffs | Penny edge + drop of vinegar | 10–30 seconds | Rinse immediately |
| Enamel cookware | Grey marks | Light rub along mark | 15–45 seconds | Avoid coloured decals |
| Brass hardware | Tarnish | Lemon + salt + penny, then polish | 30–60 seconds | Not for lacquered brass |
| Stainless steel | Transfer streaks | Feather-light passes with grain | 20–40 seconds | Test small area first |
How to Use a Penny Safely
Preparation is everything. Wash the coin in hot, soapy water and wipe it dry; coins are handled constantly and can carry grime. Moisten the stain with a few drops of vinegar or lemon juice. Sprinkle a tiny pinch of salt if you’re tackling oxides or scuffs—the chloride speeds the lift. Hold the penny between thumb and forefinger. Use the rim, not the face, to control pressure and direction.
Start with a feather touch. Glide along the mark in short strokes, pausing every few seconds to check the surface. If the stain fades, continue; if the glaze dulls, stop immediately. Less pressure, more passes: that is the winning formula with copper. Wipe away residue with a damp microfibre cloth and inspect under good light. For brass or copper items, follow with a neutral rinse and a drop of mild detergent to remove any acidic traces.
Finish the job by neutralising and protecting. A quick wipe with a solution of bicarbonate of soda in water (weak, just to remove lingering acidity) helps preserve finishes. Dry thoroughly to avoid water spots. Do not use this method on non-stick coatings, lacquered metals, painted appliances, marble or limestone (acid-sensitive), anodised aluminium, or delicate plastics. If in doubt, trial a hidden patch first. Gloves are wise if you have sensitive skin.
Limits, Hygiene, and Legal Notes
Set expectations. A penny defeats inorganic scuffs and light oxide films; it will not lift dye-based stains, mould, or deep mineral scale. For those, choose targeted cleaners: a chelating descaler for limescale, oxygen bleach for organic stains, a solvent for inks. Hygiene matters too. Coins are handled widely, so sanitise the penny before use and clean the area after. On food-contact surfaces, wash the area with washing-up liquid and hot water once finished.
The legality question arises often. In the UK, using a coin as a tool is fine; melting or defacing for fraud is not. Keep the coin intact and don’t grind it down. If the idea of a pocket coin bothers you, use a strip of pure copper from a DIY store or a purpose-made copper scrub pad, which offers the same chemistry with better ergonomics. The smartest cleaning is selective: use copper where it shines, retire it when it risks damage. That restraint saves finishes, time, and money—and cuts chemical waste down to size.
There’s something irresistible about a fix measured in pennies and seconds, especially when the science is sound and the results gleam. The copper-on-acid trick gives you controlled abrasion and a quick chemical assist, provided you keep the touch light, rinse promptly, and avoid sensitive finishes. From porcelain sinks to brass latches, it turns “permanent” marks into temporary inconveniences. Will you try the penny test on a small, hidden patch this week—or is there another humble household material you swear by for tackling the stains that refuse to budge?
Did you like it?4.5/5 (28)